Showing posts with label Light pollution. Show all posts

Friday, June 26, 2026

Easy to make light and wind screen

Light screen fully assembled and functional.
Most of us are having to contend with worsening light pollution at our homes or other observing sites, and not just the overall sky glow, but nearby lights. Since LEDs became cheap and widely available, people just have to have more and more lighting. Many still think it deters crime (it doesn't), so they add lights, always brighter and rarely properly shielded. I can count at least nine lights, sometimes more, that are consistently in my eyes in my front yard, where I have to observe (trees in back). I also have cars stopped at a nearby traffic light whose headlights point directly at me.

But you can fight back, as I noted in my article on building a "Redneck Observatory," with stuff you have around your house or garage, if you have one. One of the items I used was an old PVC pipe target stand I used to use for .22 target practice out at an unsupervised public range. I added a wood frame and a blanket. I'll use that light screen more often than setting frames up against my garbage cans because I observe more now on a grassy strip on my front lawn and it's sometimes messy to roll the cans across the grass. I decided to make a second one to block out the lights across the street and the headlights and lights 90 degrees around from there.

Some people say they do fine just using a hood over their head, and I do use a hoodie to reduce light trespass into my eye and eyepiece, but I find it's just not very satisfying to see all those lights glaring at me as soon as I raise the hood. I also don't like being lit up like daylight and unaware of what's around me. If that works for you, though, no need to bother with a screen. But I think there is a primodial desire for shelter from outside intrusions that makes the screens, or an observatory, much more satisfying. It's kind of like a snow fort for amateur astronomers!


Light screen

The completed frame (non-transportable version)
The light screen consists of a base of 1-1/2" PVC pipe in two upside down "T" configurations that holds a taller frame of 1x2 or 2x2 furring strips (or fancier wood if the spirit and wallet moves you; that's a piece of old baseboard molding in the picture). Over that you drape a cheap moving blanket and use plastic spring clamps to hold it to the frame. The height depends on where the lights are in relation to your eyepiece height and how much room you want to maneuver. This one stands 72" tall to block out lights from right across the street. Do some measurements at night to be sure you end up with what you need.

Why the moving blanket? You could use a tarp, but I'm in a residential neighborhood and poly tarps tend to be noisy with any kind of wind. Moving blankets are cheap, they block out all the light, they are relatively heavyweight so they don't flap aound much, and when they do, they are quiet. You can also use them as blankets when observing from a recliner or to pack around your telescope.

Schedule 40 PVC pipe is generally sold in the United States in 10' lengths. My car can only fit an 8' length, so I used the self-cutting molding station in the store to cut off two feet of it. You could also bring a hacksaw and cut it in the parking lot, but then you'd be spreading plastic sawdust all over. Pine furring strips or their equivalent are usually 8', so no problem there. 

You'll use four PVC "T" fittings to make the joints. These are friction fit together so you can take it apart as needed.

The process, in a nutshell, is to cut the PVC pipe, assemble it, cut the furring strips, and assemble the frame. The frame just sits in the pipe openings.


Wind screen

Set up as a windscreen with the blanket lower.
The light screen can do double duty as a wind screen if you substitute 2x2s for the 1x2s and stake the feet into the ground or weight them down with something, which would be necessary if you set up on pavement. The  blanket shown is a small 72x40" (actual 70x39").

Depending on whether you sit or stand, and how tall your setup is, you may also want to lower the height, as shown at left.

You can adjust the width of the PVC feet by cutting different lengths for the cross piece. 

Note that  you'll want the side facing us in the image at left to be on the windward side so the blanket is blown against the frame. You can use additional spring clips to hold the lower part of the blanket to the frame if necessary.

Be realistic about how strong a wind it will be able to handle, and build accordingly.

The feet staked into the ground

Staking down the four feet will help keep the screen in place with some wind. I wouldn't set it up in wind over about 15 mph so you don't risk it plowing over your telescope if it lets go. You be the judge. (Put the stakes all the way in. I didn't bother for this picture but it'll keep it anchored better.)

If you're on pavement, use weights instead, but they have to be more than about 10 lbs. per side to hold it in any kind of wind. Leaving space below the blanket at the bottom will help it from becoming a sail. You want the protection at the level of the scope tube.

Parts list

  • One 10" long 1-1/2" (inner diameter, it's marked on the pipe) Schedule 40 PVC pipe.
  • Four PVC 1-1/2" Ts (S-S-S) for pressure applications. Make sure all three openings are 1-1/2" and smooth inside, not threaded. Don't get cleanout Ts, the pipe won't go in straight in the middle connection. The cleanout Ts to avoid have a slight curve to the outer contour.
  • Three 8" long 1x2" furring strips (or 2x2" if  you want it to be sturdier to stand up to higher wind, at the expense of a bit heavier frame). Seems that the big box hardware store selection gets worse every year. Cull through the boards to find the least warped, twisted, split, and otherwise pathetic specimens you can find. Find a good lumber yard instead if you can. You can use treated or untreated wood. Treated will be more expensive and heavier. Unless you are leaving the screen out in the elements (not recommended) you really don't need treated.
  • Eight wood screws. Make sure they are long enough to join the two pieces of wood together firmly without protruding out the back side. 1-1/4" should work for 1x2s (which are really 3/4x3/4) and 1x2s to 2x2s (which are anywhere from 1-1/4" to 1-1/2", pressure-treated being somewhat smaller), as long as you put them through the 1x2 first.
  • Alternative to wood screws: Four 1/4-20 knobs and four 1/4-20 T-nuts (less than 3/4" long). This allows you to disassemble the frame for transportation.
  • Cheap moving blanket or other blanket. A smaller size, like this 70x39" blanket (actual measurement) won't cover the entire frame from top to ground, but you probably don't need to, and it's lighter and less bulky than a larger blanket. Really, any blanket or tarp will work, depending on what you want. You can size the frame to fit whatever blanket works for you.
  • Four steel nail-type stakes (such as these) or weights (bags of grass seed or soil work well on pavement).
  • Four to six plastic spring clamps for holding the blanket to the frame.

Tools

  • Wood saw of some kind
  • Hacksaw or wood saw to cut the PVC pipe (unless you have a suitable pipecutter for 1-1/2" pipe).
  • Electric drill, with a countersink bit that matches your wood screw size (size 6 or 8 should work) and an 11/16" bit for drilling the PVC pipe to accept typical steel nail peg stakes
  • Phillips screwdriver
  • Sandpaper
  • Paint if you want to paint the wood


Build it

You can adjust any measurement as you see fit, especially if you plan on transporting it in your car, but these are my suggested dimensions.

Cut the following pieces of PVC pipe:

  • (4 pieces) 16" each (these are the feet)
  • (2 pieces) 9" each (these are the lower uprights)
  • (2 pieces) 4" each (these are the upper uprights)
  • (1 piece) 24 to 30" as you desire (this is the crosspiece and will determine the width of the frame uprights). The frame in the images at the beginning of the article has a 24" PVC crosspiece, for reference.
All the pipe pieces cut and the 4 Ts
If you want the widest possible spread between uprights and you have to cut the pipe to fit it in your car on the way home from the store, cut a 30" piece off the 10' length in the store.  You can always shorten it, but that will allow  you to cut all the other pieces to the dimensions above for a total of 120". After each cut, use a small piece of sandpaper to clean the cut edges. Sweep or vacuum up all the plastic dust and bits. Wear a mask so you don't get plastic particles in your lungs.

Brace each foot piece in a vise, clamps, or wood, and carefully drill a hole just big enough for the stakes you are using through both walls of each end, about 3 inches from the ends. The stakes will go through these holes into the ground, if you use them.


The assembled pipe base
Assemble the pipe frame as shown in the image at right.

Now, decide how high you need the wood uprights to be. You will be putting the wood uprights into the open pipe holes. I cut two 8" pieces of 1x2 and slip them into the pipes first. This allows the uprights to be shorter and still give me the height I want.

A piece of 1x2 slipped into the upright pipe
Left: An 8" piece of 1x2 dropped into the upright pipe from above will compensate for making the wood upright 8" shorter and easier to transport.

Cut the wood uprights from 1x2s (or 2x2s for a heavier frame). Cut a wood crosspiece to span across the two uprights as a brace. Cut a crosspiece for the top of the wood frame, over which you will drape or attach the blanket. This will probably be wider than the pipe base because you want good coverage with the narrowest base that will be stable. I used leftover wide baseboard molding for my top crosspieces, but you can use a piece of 1x2. 

If you use 2x2s for the uprights you will probably have to shave the four corner edges down some on the lower 8" of the upright so they'll fit snugly into the pipes. The 1x2s should fit without modification.

2x2s shaved down to fit into the pipes
Left: I had to shave the ends of the 2x2 uprights down with an orbital sander so they would fit into the pipes. 

If you're making this more wind resistant, use 2x2s instead of the 1x2s for the uprights, but you can probably stick with 1x2s for the crosspieces. The lighter the frame is, the easier it is to set up, and the more likely you are to use it. The heavier it is, the more wind resistant. It's a tradeoff.

You can fasten the wood frame together with wood screws, two at each joint. However, to make it portable so you can take it to a darker site that maybe has an annoying light or two or is often windy, you can instead drill holes where the pieces connect, then insert knobs through the two pieces and fasten them with nuts or wingnuts. 1/4-20 threads should be fine.

Knobs instead of wood screws for easy disassembly
Left: Using knobs instead of wood screws to attached the frame crosspiece. I have the pieces labeled with painter's tape so I can reassemble it easily. The hole in the side of the upright was a mistake. It's easy for a bumbling woodworker like me to not to get the hole straight, so I had to redo it on the other face of the 2x2. 


Close up of the knob
Right: Close up of the knob attachment point. Use a flat washer on both sides, and a nut or wingnut on the back side. These are all 1/4-20 size threads.


Here is the finished frame for the transportable wind screen. You can drill additional sets of holes in the uprights for a variety of heights.

The completed frame

The pipe base broken down to fit in the car
To pack the screen in a car, you detach the center cross pipe in the base and the crosspiece or pieces of the wood frame. Consider the length of the uprights in this case so they fit comfortably in your car (maybe with ends in the passenger seat footwell, extending through the gap between front seats, and across the tops of the back seats). This is why I like the 8" pieces of wood inserted into the pipes first. That allows you to use shorter uprights.

Once you have everything cut, sand the wood so you don't get splinters and paint it if desired, mostly to smooth the surface further and protect it from dew and other moisture. Bare wood and the white PVC pipe will show up well at night, but if you use it as a wind screen in a really dark sky, you might want to sew or tape some white fabric or tape to parts of the blanket so no one walks into it in the dark. If you have a site that dark, I envy you!

My old light/wind screen.
Why not make the whole screen frame with PVC pipe? I used to have one I designed that used 3/4" pipe, shown at left, and it worked well for a while, but after some years the pipes were either too loose or too tight and setting it up and taking it down became a chore. My wife sewed the fabric with pockets to slip the pipes into and velcro tabs. The wind would often pop it apart and eventually broke a couple of pieces. So I recommend a hybrid PVC and wood frame. It's also lighter and cheaper. PVC pipe has gone up a lot in price.

Friday, May 23, 2025

How to find a darker sky

The sky from Arizona Sky Village
One of the most dramatic improvements you can make in the quality of your visual observing is by getting to a darker sky. Most of us live in or near big cities, or at least larger towns. Getting away from all those lights will allow our eyes, binoculars, and telescopes to see more in the night sky. Today, being mobile is more important than ever. Even imaging and electronic assisted astronomy benefit from darker skies, despite the ability to counter light pollution to an extent through technology. Some amateur astronomers say that the best filter for your telescope is the "car filter." Get in a car and drive somewhere darker.
(Above: The sky at Arizona Sky Village. Photo by Astronomerica)

Neighbors' all night lights
If you are new to astronomy and you are lucky enough to live in a reasonably dark sky without neighbors who try to banish the evil darkness with all-night lights, you may be able to do most if not all of your observing at home. But most of us aren't so lucky, and home observing must contend not only with pervasive sky glow but neighbors' lights, streetlights, parking lot lights, headlights, building lights, etc. I only observe the Moon, bright planets, and occasional double stars from home. Everything else means driving somewhere else to get better views.


Contact a local astronomy club

The best way to find observing sites that are reasonably dark, have little or no glare from local lights, are safe, and have decent horizons is to locate and contact your local astronomy club. Chances are that someone has already done the hard work of finding suitable locations and negotiating with the powers that be for the use of that land at night for observing. I am lucky to belong to the Northern Virginia Astronomy Club, one of the largest amateur astronomy clubs in the United States. We have numerous sites from suburban to dark sky, depending on how far you are willing to drive.

Being a member of a club usually gets you access to sites that the general public may not be allowed in at night. It will also give you information about members' favorite sites that may not be official club sites, but are still viable places to observe.


Do your own research

If you don't have a nearby club, you can do your own research, or ask on the various fora such as Cloudy NightsStargazer's Lounge (for the U.K.), The Sky Searchers, or various Discord servers what others might recommend. This also works if you are traveling and want to know where a good place to observe might be. For your own safety, never tell anyone except relatives and trusted friends where you are going to observe, but make sure someone knows where you are.

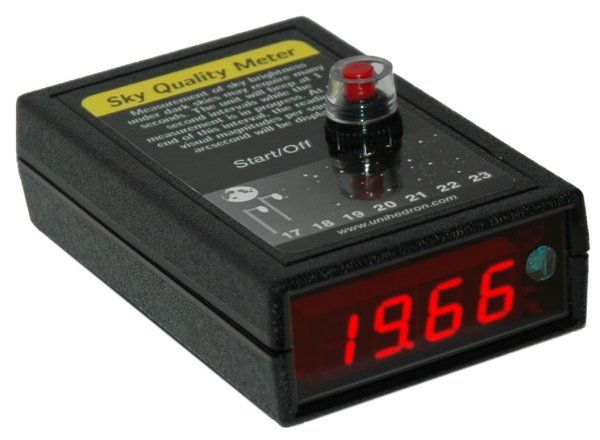
Unihedron's Sky Quality Meter
The most accurate light pollution map is the one developed and maintained by David Lorenz, called Light Pollution Atlas. The most recent data is from 2023 and the satellite data and methods he uses to determine sky brightness seem to be more accurate than other light pollution maps. If you click on a point, it will tell you the year of the data, the latitude and longitude, and the sky brightness measured in magnitudes per square arcsecond, close to what you would get if you used a sky quality meter (SQM) to measure the sky (shown above), as well as a ratio of artificial/natural brightness. These are all approximations in the map, and tend to still be overly optimistic especially while we are near solar maximum, but give you plenty of information to see how skies compare relative to each other.


Section of David Lorenz's Light Pollution Atlas
Left: It's a long drive to a dark sky from the Northeastern U.S. megalopolis. The dark blue near the top is the area around Cherry Springs State Park in north-central Pennsylvania, a favorite observing spot for those in the region. The other blue area in the lower left is in the mountains of West Virginia, home of the Almost Heaven Star Party.
(David Lorenz, Light Pollution Atlas)


You may hear people say that they live in an orange zone, or in Bortle 5, for example. The color refers to the color scale of more basic maps, which ranges from white (brightest) to black (darkest). The Bortle Scale was invented by amateur astronomer, comet observer, and contributor to Sky & Telescope magazine John Bortle, and is a scale to measure the brightness of the sky in a particular place and time based on what can be seen in the sky. More people will refer to their site using the Bortle Scale than with an SQM reading, so it's good to know what both mean. Scroll to the bottom of this page to see a rough comparison chart. (Your browser may warn you the site is not secure. Proceed only if you trust those nefarious amateur astronomers!) 

Lorenz's atlas appropriately does not use the Bortle Scale because it is dependent upon observations on a specific night by a specific individual, assuming they didn't just read it off a map. However, if someone who has a reasonable amount of observing experience tells you he or she estimated that a site was Bortle 2, you can be pretty certain it's nice and dark and you will not be disappointed observing there on a good night. But most people don't actually bother trying to make Bortle Scale observations. I prefer looking at the Atlas or just staying away from population centers.

Here is the color scale from David Lorenz's atlas, calibrated to the brightness readings:

Color coding for the Light Pollution Atlas


Although the SQM readings are more precise, I personally find it much more difficult to remember how good a sky is based on the SQM number. For example, my usual semi-dark site is listed at 21.01 (greenish-brown). The site I camp at is 21.28 (green). My home is a sickening 18.42 (red bordering on light gray). 

Light Pollution Atlas reading for Adirondack Mountains
I figure anything around 21.0 and higher is usable for deep sky observing and I can get some decent views that are worth driving an hour or so. Anything about 21.7 and higher is going to be very good to excellent, and there are only two big areas in the eastern United States like this—in the mountains of West Virginia and in north-central Pennsylvania—that have suitable observing places, unless you own private property in the Adirondack Mountains and have cleared some trees. But these are difficult number ranges to remember, so I get why people use the color scale or Bortle rating. Looking at the map, it's much easier to see where you need to head for dark skies because of the color scale. (David Lorenz, Light Pollution Atlas)

Other considerations

A dark sky is not the only criterion. There is the weather, dust, and wildfire smoke. Also avoid hours where the Moon is up. You need a good horizon. As noted, the Adirondack Mountains in upstate New York get as dark as 21.91 (see above), if you believe the map readings, but good luck finding some open sky. 

Cessna 152 landing on astronomer
You want to avoid parks that close at dusk (almost all local and state ones) unless you like talking to the police, stay off private property without the owner's permission, and avoid dangerous places. An airport runway might seem like a great place until a Cessna flies out of the darkness and tries to land on your head. (Cessna 152 by Ramon FVelasquez, CC BY-SA 3.0, via Wikimedia Commons, with edits)

You also need to be away from nearby lights, which is a much more difficult endeavor than it might seem at first, as many people absolutely LOVE all-night "security" lights. I've always thought this was odd, because no one is out there in the middle of the night to see prowlers moving around. Well, except for astronomers, who unfortunately won't be there to scare off the prowlers because YOUR LIGHTS ARE TOO ANNOYING! I will leave you with one of my "poems" from the Redneck Patio (see link at right):

Criminal

Porch lights
Garage lights
Whitewash the suburban wasteland
And kill the night sky
As I draw chalk emojis
On the driveways,
Unseen.

🙉🙈🙊 

Monday, June 24, 2024

Build your own Redneck Observatory

Redneck Observatory v.1 set up in the driveway with a 10-inch dob.
Redneck /rÄ•d′nÄ•k″/ (adj.) - Where there’s a will—and duct tape, a few bungee cords, some plywood, and maybe a few wood screws—there’s a way.

The two enemies of a dark sky are sky glow (a bright glow in the sky resulting from myriad city, town, and industrial lighting) and glare (nearby lights that shine in your eyes and create light trespass). You can’t do much about sky glow other than move somewhere where it’s darker, but you do have some options to deal with glare and light trespass.

Dealing with local lights, your options are:

1. Move somewhere else. Not feasible or even advisable for most people, at least in the short term.

2. Find a better place to observe. Whether it’s down the street or somewhere you need to drive to, it’s usually the best option, and you can often improve both the sky glow and glare situation. But we don’t always want to cart our gear beyond our home environs, and some nights it may only be clear for a short time and we want to take advantage of that right at home. Plus there’s the convenience and safety of being at home.

3. Talk to neighbors about shutting their lights off at night, shielding them, or putting motion sensor lights in. If you have only a couple of offending lights, this might work in the short term, but even cooperative and friendly neighbors will forget or want them on at times. My neighbors clearly believe all-night lights keep crime away and make them feel safe from the dark. I won’t get into the issues with that philosophy, but they have a right to think the way they do and I’m not likely going to change that.

You can also offer to show them stuff in your telescope and approach the lighting issue that way. Recently, I was at a cabin in the mountains, and my brother and I set up our telescopes outside our cabin. We set up before it got dark and it attracted the attention of our neighbors in the other cabins. By the time we were done showing them some objects and chatting about astronomy, we had no lights to worry about the rest of the night.

4. Accept the sky glow and block out the local lights. That’s what I’m talking about here.

At my house, the backyard is mostly blocked by trees and other houses. Therefore, I have to observe in the front yard. All of the neighbors up and down the street have all-night garage and porch lights, usually ten blazing away, none of which are shielded, and only one of which is on a motion sensor. In addition, I have headlights from a busy intersection shining directly at me as cars wait at the red light.

I took control of the situation and built what I call my “Redneck Observatory."

My observatory consists of found objects like my garbage and recycling cans, so I guess I could also call it my “Dada Observatory.” I have a car parked on one side of the driveway, I use frames from the packing of a bathroom sink we had installed, a PVC pipe holder for a target frame I built, some cheap moving blankets, some plastic spring clamps, and a few bungee cords.

Redneck Observatory consisting of stuff that was just lying around anyway.


The plan was to use stuff I already had sitting around nearby that would be easy to throw together to block out the lights. The car is usually parked there, so I just put a 4x4 piece of wood, left over from stacking flooring, along the edge of the roof with a short extension to hold a small moving blanket in place. The blanket is clamped to the end of an upright frame consisting of the aforementioned bathroom sink packing frame with a height extension made of furring strips (my favorite cheap wood) and old baseboard from the flooring job.

A packing frame leans against the garbage can and is bungeed to it to keep it from falling in the wind. The other packing frame (never throw stuff out that you might be able to use) leans against the recycling can and is likewise bungeed. A big moving blanket is thrown over both frames and clamped in place with spring clamps. The third wall, on the right, is my old PVC target stand with a frame made of furring strips and old baseboard, again with a moving blanket thrown over it and clamped in place.

It takes me 20 minutes to set up and break down if I take my time. Not my casual or optimistic estimate, I actually timed it. If I observe for an hour or more it's worth it to me. Rarely do I observe for a shorter time.

Observing inside the Redneck Observatory.


So before you give up, look around the house and see what you have. Maybe you can build your own Redneck Observatory.

Thursday, April 18, 2024

Light pollution and the future of amateur astronomy

Photo of the U.S. Capitol dome at night with a bright, unshielded lightpost in the foreground.
Photo by VillageHero (CC)


A thread on the Cloudy Nights forum got me thinking about light pollution and the future of amateur astronomy, especially the visual astronomy that I love so much. I can only say for certain that amateur astronomy, for those whom circumstances allow, will still be an enjoyable hobby in the future in some form or another.

Based on trends I'm seeing now from my limited point of view, cheap Electronically Assisted Astronomy (EAA), or some semblance of it, will likely be the mainstream portal for new amateur astronomers or casual hobbyists until the next big thing comes along. We're almost there already. EAA is the use of a camera in lieu of an eyepiece at the telescope to capture and view images in near real time. It has recently become more affordable with the introduction of the Seestar S50 Smart Telescope, which is often paired with a tablet on a tripod for viewing its images. While still hindered by light pollution, these telescopes can cut through much of it, making for satisfying imaging even in light polluted areas.

People want to create something to share on social media, not just look at stuff. Who creates astro images and doesn't share them online? Here I am sharing material on visual observing because I can't share the actual views themselves, other than describing them in words or sketches. Social validation is huge in our society, probably always has been, and I don't see that changing.

I think most astro-imaging will be done from the comfort of home using data obtained in the backyard, from remote telescopes, and from data shared online (like Hubble data). Why drive way out, freeze in the cold, set up equipment, etc. when it will no longer be necessary? 

Will light pollution still be an issue for amateur astronomers? I think it will likely only be a pressing issue for a shrinking group of visual astronomers. Imagers, who used to be the biggest proponents of keeping the sky and observing field dark, now can obtain and process fantastic images from horribly light polluted locations, like this one from someone's backyard in Washington, DC. They can reject frames ruined by light, satellites, planes, clouds, etc. Sure, dark skies are better, but are no longer essential to create great deep-sky images. Visual observers have no such recourse.

At our public and club-only star parties, imagers are now the ones with bright unshielded screens, along with those with EAA setups, because dark adaptation no longer matters to them. At the latest public event, a young girl asked me, "Why do you ban white lights and pass out red filter material for our phones when you all have your bright white screens on?" I couldn't answer her.

In the foreseeable future, I think a few visual observers will be the only amateur astronomers with the self-interest to fight light pollution, and it may be mainly wildlife enthusiasts that take up the torch (see what I did there). I think most visual observers will just drive (or move) somewhere darker, or observe the bright planets, the Moon, the Sun, and double stars at or closer to home. That's what I do now.