Most of us probably live in light polluted urban or semi-urban areas. My home usually exhibits a Bortle 8 sky at best (no hope of seeing the Milky Way and only the brighter constellations visible on a good clear night). We eagerly await the period around new moon so we can get somewhere darker and do some deep sky observing: galaxies, clusters, nebulae, hoping that we might have some clear nights.
We've all probably observed the Moon when it was up. But have we really observed it?
I am by no means an accomplished lunar observer, primarily because for many years, like many of us, I waited for new moon to do my observing. Now that I'm unable to get out to a darker sky as often, I have developed a new attitude toward our little rocky satellite, and I've discovered that lunar observing is pretty damn B A D A S S.
Having a 6-inch reflector as my current "go to" scope, I can't see many of the smaller features that someone with a 12-inch with consistently excellent seeing might see. Yet, given my limitations, I've found lunar observing to be something I look forward to as much, and sometimes more, than deep sky observing.
[Want some Pink Floyd on YouTube to accompany you while you read this post? Click here.]
Catch the excitement
When I was much younger, the race between the U.S. and the Soviet Union to put spacecraft and eventually people on the Moon was exciting for the general population, and even more so for space nerds like myself, whose favorite movie then (and now) was 2001: A Space Odyssey. Say hello again to HAL 9000.
Now, with spacecraft once again landing on the Moon, some of that excitement is returning. Where are the landing sites? Where did the Apollo astronauts land? What are the various features visible in small telescopes? Can I see the flag on the Moon? (No, a flag is much too small to see in a backyard telescope. Buzz Aldrin saw the Apollo 11 flag blown over upon ascent from the lunar surface, but the other five flags planted in the Apollo program are still standing, although they may be quite faded and deteriorated from the ultraviolet light and temperature extremes. See
this LROC explanation and
this NASA evaluation for further discussion of the flags on the Moon.)
Above: The Apollo 11 landing site viewed by the Lunar Reconaissance Orbiter Camera showing the Lunar Module (LM) just left of center and several instruments left by the astronauts. The image is roughly 225 meters across, or about 738 feet. In comparison, an 8" telescope will only resolve details as small as about seven times the width of the image, or about a mile across, or half an arc second in perfect seeing. With a good Moon map, however, you can identify the general location of the various spacecraft landing sites. (NASA/GSFC/Arizona State University)
Get started being a lunatic
I recommend starting your lunar observing by simply perusing the surface, especially along or near the terminator—the line demarcating sunrise or sunset, where the shadows highlight the relief of the various features. Don't worry about names until you get curious. What is that crater with the long bright rays? How about that one with the straight radial line inside it? What is that U-shaped valley by that bright crater? What is that long cliff-like feature? How about that gap in that huge mountain range? Discovering these features on your own and then looking them up on a Moon map is part of the fun.
The ever-changing shadows
One of the many great things about lunar observing is that the view is continuously changing as the Sun's light marches across the Moon, with the terminator highlighting new vistas every night. One rule of thumb is that the period between new moon and full moon, centered on first quarter, will place the Moon best for observing in the evening sky, and the nights centered on last quarter will place the Moon best in the morning sky. First quarter in the first part of the night, last quarter in the last part of the night. In the evening, you'll be seeing sunrise marching across the Moon. In the morning, sunset.
You can look up the rise/set times and current phase of the Moon on many websites, including Time and Date. There are also many apps available, such as Moon Phase Calendar.
The importance of good seeing
With lunar observing, we really want to see detail as sharply as possible, with little to no blurring by the atmosphere. A night with steady air, or good "seeing," will yield more detail than a night of poor seeing when the Moon looks like it is rippling, undulating, or just plain fuzzed out. How do you know when the seeing will be good? Well, if you're like me and live under the jet stream, it won't happen very often that you get excellent seeing. But usable seeing can often be had.
Check apps or sites like Astrospheric or Clear Dark Sky (R.I.P., Attilla Danko) for seeing predictions for your location, understanding that they are just predictions. Other factors can affect seeing, especially from urban locations where heat rising from streets, driveways, and roofs can turn an otherwise good night of seeing into churning soup. If your telescope needs some cool down time, typical for reflectors or SCTs, try to set it outside for at least 30 to 60 minutes and use a fan or insulation to reduce internal tube currents.
Charts and Moon map apps
While my favorite charting app, Sky Safari Pro, shows lunar features when zoomed in, I find it difficult to see in night mode, with the features just too dim. Since I do most of my observing of the Moon from home, I can hop indoors and check out the excellent (and free) Virtual Moon Atlas, which I highly recommend if you have a Windows or Linux operating system. Once you set it up, it will show you where the terminator is currently, you can turn labels on or off, zoom in to an astonishing level of detail (thanks to Lunar Reconaissance Orbiter Camera imaging), look up information about various features, and even orient the view to match your telescope's. There are other apps available that you may prefer. Try Moon Globe for iPad, or the online Real Time Map of the Moon.

Left: Virtual Moon Atlas showing the phase on a particular date and time and set up for a 180 degree rotated image with south up and astronomical west to the left, as seen in a reflector. The Moon is about 31 arc minutes in diameter, or half a degree as seen from Earth. On the other hand, the Earth is about 2 degrees in diameter as seen from the Moon.
Note that when describing directions on the Moon, we use the convention of east being toward Mare Crisium, the circular dark plain just below center near the left limb in the image. This conforms with how terrestrial maps work, and is opposite from directions described for the night sky and deep sky objects. The idea was that lunar explorers would not get confused by "backwards" maps of the surface, compared to terrestrial maps. The crater Copernicus is on the terminator just below center.
Right: Zooming in on the crater Copernicus, which is about 58 miles in diameter. 37 mile-wide Eratosthenes is the crater in the lower left. The image is about 3.5 arc minutes wide.
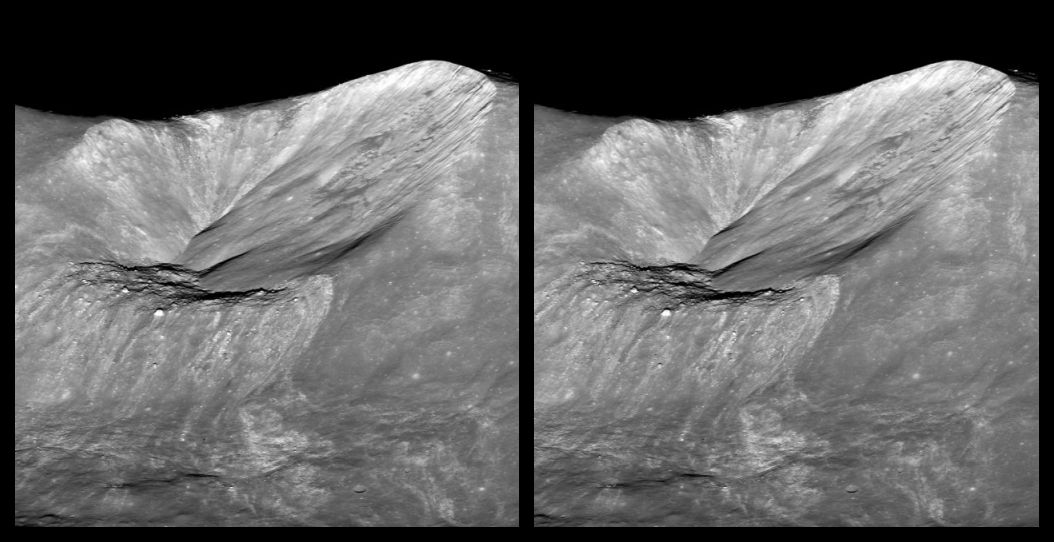
Left: Zooming in further into the interior of Copernicus. This image scale and detail is beyond the capability of most backyard telescopes. The image is about 25 arc seconds across.
The central peaks are almost 4,000 feet high, ,while the crater wall at left is about 13,500 feet high. The detached part of the central peak just to the right of center is about 9 miles wide, or about 7 arc seconds in the telescope.
Lunar features and naming conventions
Features on the Moon are labeled in Latin (and you thought it was a "dead" language!). These are based on names first proposed by Giovanni Battista Riccioli, an Italian astronomer and Catholic priest (hence the Latin) who lived in the 1600s. His Moon maps were drawn by Francesco Maria Grimaldi, his colleague and fellow scientist/priest. They both have large walled plains, close to each other on the western limb, named after them. Many features, mostly craters, have been named since then. For more on naming, see the Smithsonian Magazine's How are Places on the Moon Named?
Some of the main types of features include:
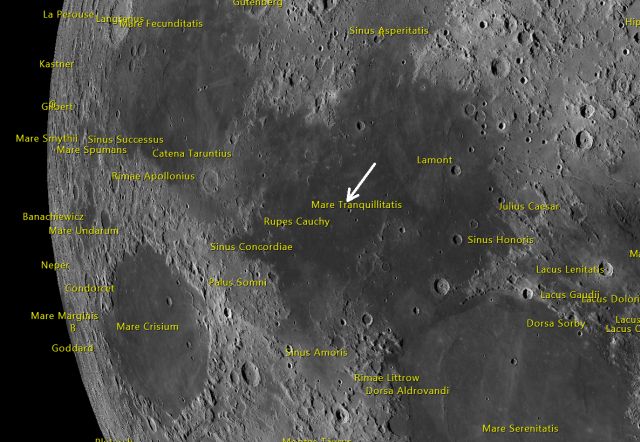
Mare ("sea"): the expansive darker, smoother basaltic plains formed from molten rock that can be seen with the unaided eye. Examples: Mare Tranquilitatis (where the Apollo 11 astronauts landed), Mare Crisium, and Mare Imbrium.
Left: Mare Crisium (Virtual Moon Atlas. South is up.)
Sinus ("bay"): A smaller plain similar to a mare. Similar smaller "maria" include
Lacus ("lake") and
Palus ("marsh"). Examples: Sinus Aestuum, Sinus Iridum, Lacus Lenitatis.
Left: Sinus Aestuum, with craters Eratosthenes below center and Copernicus at right edge (Virtual Moon Atlas. South is up.)
Crater: 95% of named features on the Moon are craters, almost all of which were caused by the impact of meteors or asteroids. They are named after dead scientists and explorers. Examples: Copernicus, Tycho, Clavius.
Left: Clavius, amid many other craters in the lunar southern hemisphere. This was the home of the fictitious moon base in the movie 2001: A Space Odyssey (Virtual Moon Atlas. South is up.)
Mons/Montes ("mountain/mountain range"): These can be individual mountains or massive mountain ranges. Examples: Montes Apenninus (named after the Apennines on Earth), Montes Alpes (named after the Alps on Earth), Mons Piton (named after a peak in the Canary Islands).
Left: Montes Apenninus (Virtual Moon Atlas. South is up.)
Vallis ("Valley"): Usually, but not always, named after a nearby crater. Examples: Vallis Schröteri, Vallis Alpes, Vallis Rheita.
Left: Vallis Schröteri. The deep crater to the left is Aristarchus. The valley's end points to the crater Herodotus. (Virtual Moon Atlas. South is up.)
Rima/Rimae ("rille/rilles" or narrow channels): These were mostly formed by lava flows, collapsed lava tubes, or grabens caused by the sinking of the surface between faults. Examples: Rima Hyginus, Rima Cauchy, Rimae Ariadaeus.
Left: Rima Hyginus. Crater Agrippa is in the upper left. (Virtual Moon Atlas. South is up.)
Rupes ("scarp" as defined by the IAU, but actually a fault looking like a huge cliff): Examples: Rupes Altai, Rupes Recta, Rupes Cauchy.
Left: Rupes Recta, the "Straight Wall," on the southeast edge of Mare Nubium (Virtual Moon Atlas. South is up.)
Dorsum/Dorsa ("ridge/ridges"): Tectonic features found in maria, these "wrinkle ridges" are long, thin folds formed by the cooled and solidified edges of lava flows. Examples: Dorsum Heim, Dorsa Smirnov, Dorsum Zirkel.
Left: Dorsa Smirnov, curving vertically down the center. The crater Posidonius is at bottom left. (Virtual Moon Atlas. South is up.)
Advanced lunacy
If you really want to get into all the details of the Moon's orbit, phases, libration, etc., check out NASA's Scientific Visualization Studio.
For more ideas on lunar observing, and what others are looking at, see The Association of Lunar and Planetary Observers (ALPO) Lunar Section.
If you don't mind logging your observations in detail, you might consider joining the Astronomical League and trying out their Lunar Observing Program, which contains features to view with the unaided eye, binoculars, and a small telescope. Even if you don't log your observations to get the certificate, this gives you a list of prominent lunar features to observe.
Welcome to the lunatic asylum!