I'm a big 3D fan, especially of stereogram pairs that require no special equipment to see.
Here is a variety of images featuring different formations on the Moon in 3D. Seeing these from a new perspective adds to our understanding of what we observe in our telescopes. In this case, we are seeing them closer than we ever could from Earth, at differing angles, and in simulated 3D.
These are stereoscopic pairs using the parallel viewing method. See the instructions for my 3D constellations for details on how to view these. With practice, almost everyone can learn to do it. It's worth the effort!
These images were taken by the Lunar Reconnaissance Orbiter Camera, which has been orbiting the Moon on the LRO since 2009. It has taken some spectacular images of the lunar surface, a few of which are reproduced here in 3D. All images are courtesy NASA/GSFC/Arizona State University. I created the 3D versions using Owl3D and created the location maps with Virtual Moon Atlas. Definitely check out the links to details of the images and browse the other incredible images on the LROC web site. If you have those cardboard anaglyph glasses, they have quite a few images in anaglyph 3D, although the 3D depth tends to be unrealistically exaggerated in some cases.
Many of these features can be observed with small backyard telescopes. The Moon's phase is critical, because features at or near the terminator, the line between night and day, are highlighted with long shadows and can be seen easier. Features near the limb, such as the crater Stevinus, can also be seen better when the Moon's wobble, or libration, presents it a little more favorably towards us. A steady atmosphere and a telescope adjusted to the ambient temperature is also very important. Of course, if a feature is on the far side, we won't be seeing it from Earth.
Check out this cool NASA simulation to see how much the Moon varies in phase and libration throughout a year. You can also check out how the Moon will look now or at another time for the remainder of this year using NASA's visualization tool.
Unnamed crater between Lowell W and Mare Orientale
This 2.8 mile wide crater sits at the edge of the crater Lowell W and Mare Orientale on the Moon's far side. This was taken when the LRO was at an altitude of 47 miles, facing west. Not visible from Earth. See details about this image.
Mare Orientale on the lunar far side. The arrow just below crater Lowell W points to the unnamed crater in the image above.
Aristarchus central peak
Aristarchus is visible in small telescopes, binoculars, and even with the unaided eye. It is often one of the brightest features visible because it is a young crater, 450 million years old, that hasn't had time for its ejecta material to darken. Here is a closeup crop of the central peak of the crater, taken by LROC from an altitude of 60 miles, facing west. The central peak is about 1,300 feet tall and 9,800 feet wide. The crater is over 2 miles deep. The best time to view Aristarchus is four days after First Quarter or three days after Last Quarter, but try for it around Full Moon and you'll see how bright it appears. See details about this image.
Aristarchus is 25 miles in diameter. Here's another view. See details about this image.
Location of crater Aristarchus in Oceanus Procellarum. South is up.
Messier crater
About 8.7 miles across, Messier is located in Mare Fecunditatis and may have been formed by a low angle impact, causing it's oblong shape. With an apparent size of nearly 7 arcseconds, Messier and its companion crater, Messier A, as well as the two small rays pointing east from Messier A, can be seen in small telescopes. The best time to view Messier is four days after New Moon or three days after Full Moon. See details about this image.
Location of Messier crater in Mare Fecunditatis. South is up.
Komarov crater floor (detail)
Located on the far side of the Moon, the floor of 53-mile-wide Komarov crater is covered with deep fractures created when magma rose from the mantle more than 2.6 billion years ago. The largest fractures are about 1,600 feet deep and 8,000 feet wide. Not visible from Earth. See details about this image.
Lunar Orbiter image of Mare Moscoviense with Komarov crater in the left foreground.
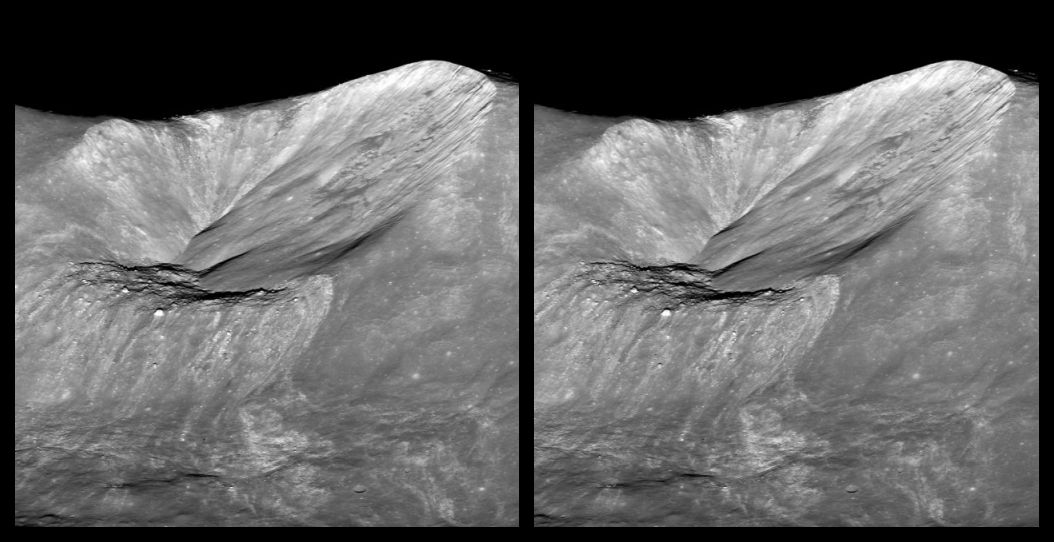
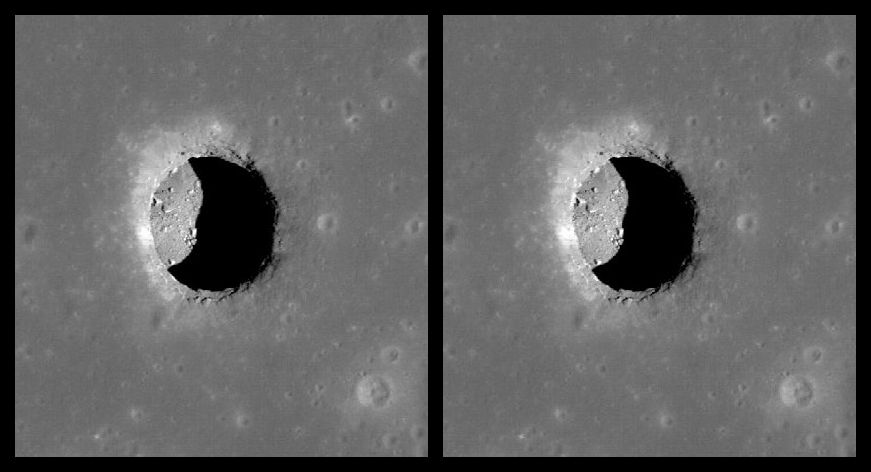
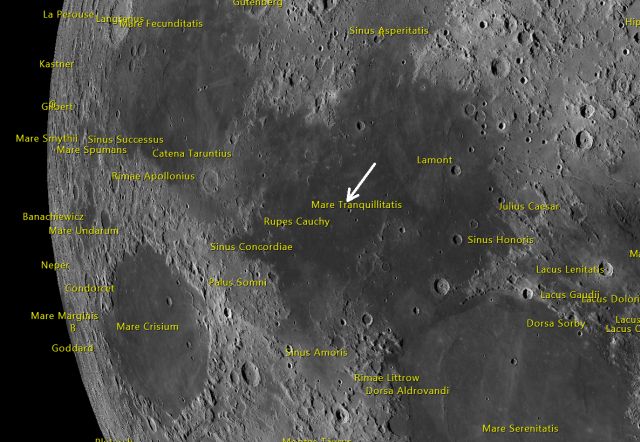
Mare Tranquillitatis pit
Pits are relatively small features that may have formed due to the collapse above a lava tube. They were first discovered in 2009 and over 200 have now been identified. The sharp edge of the opening of this pit is about 330 feet across, and the depth is estimated to be about the same. Computer modeling suggests the temperature in the shaded part of the pit may be relatively stable at about 63 degrees F, and there may be a more extensive cave or cave network. The pit is too small to be seen in backyard telescopes. See this article for details.
Mare Tranquillitatis pit location. South is up.
Mound in Stevinus crater
A fractured mound inside Stevinus crater. This may have resulted from squeeze-up of molten rock in the impact that formed the crater. The mound is about 2 miles wide. Stevinus can be seen in small telescopes, although our view is at an angle, Stevinus being near the Moon's southwestern limb. The central peak can be spotted. The mound is only about 1.6 arcseconds in diameter and may just barely be detected in some amateur images. The best time to observe Stevinus is three days after New Moon or two days after Full Moon, with a favorable libration. See
details about this image.
Location of Stevinus crater. South is up.
Location of the dome within Stevinus crater. North is up.
Wallach crater
Wallach is located in Mare Tranquillitatis. The asteroid or comet that hit the basaltic surface stirred up brighter material from underneath. Wallach is about three miles in diameter. This image was taken from an altitude of about 58 miles. A small telescope with good seeing can pick it out from the mostly flat floor of the mare using higher powers. The best time to observe Wallach is five days after New Moon or four days after Full Moon. See details about this image.
Wallach's location in Mare Tranquillitatis. South is up.
Hell Q crater
One of the many satellite craters (smaller craters near a named crater) named after Hungarian astronomer Maximilian Hell, Hell Q is a very young crater only about 2 miles in diameter. At only 1.8 arcseconds in apparent size, Hell Q requires a 6-inch or larger scope with higher power. The best time to observe it is one day after First Quarter or Last Quarter. See
details about this image.
Hell Q location. The crater Tycho is just above center on the right, near the Terminator. South is up.
Tycho
The 53-mile-wide crater Tycho has a large and prominent ray system. This oblique image was taken from an altitude of about 37 miles. The west wall on the far side in the image is more than 14,000 feet high. Tycho is an easy target in any telescope, best observed one day after First Quarter or Last Quarter. The bright rays are most prominent around Full Moon, however. See details about this image.
The central peak of Tycho. The image is about 3/4 of a mile wide. The boulder on top is about 100 yards wide. See
details about this image.
Lichtenberg B
Lichtenberg B is a young three-mile-wide crater located in Oceanus Procellarum. The ejecta darkens over time, so the presence of bright ejecta is an indicator that the crater is relatively young. Lichtenberg B can be spotted with small telescopes. Being very close to the northeastern limb, it is best observed six days after First Quarter or five days after Last Quarter using higher powers. See details about this image.
Lichtenberg B location in Oceanus Procellarum
Earth over Compton Crater
Taken at 83 miles altitude, the Earth appears over the far side crater Compton. See details about this image.